Communication
For a while now I have had a desire to learn more about machine communication. It may have started when I began using SPI to communicate with a display driver. I have wanted to understand more. UART, I2C, SPI, RS232, TCP/IP. I hear about all these forms of machine communication and even have a rudimentary understanding of some of them. But there is something about it that fascinates me, I guess it's the power of getting two machines communicating. I decided to start from the beginning and try to get a good foundation under me. I found this discussion on Electronics StackExchange. While the discussion didn't help much, a participant posted this archive.org archive of a white paper that helped tremendously. After that I found an article on sparkfun.com that seems a little more approachable and pretty much covers everything the archive did.
Diving In
Armed with my new found understanding it was time to dive in with my shiny new Raspberry Pi Pico and MicroPython. Taking a look at the MicroPython documentaion and was thoroughly confused. So I will attempt to document what I learned here. I am no expert but this is what I have learned in my testing.
UART Object
The first thing that confused me when I started actually testing was my view of the UART device on the Pico. The two UARTS (0 and 1) on the Pico do not need low level management, at least when using MicroPython. You don't have to worry about listening for connections or anything like that. Once you setup the UART it's going to listen for data according to the parameters (9600 8N1) and handle sending it. All you have to do is tell the object what you want it to send or ask it to tell you what it has received. First we setup our UART object, I am going to use the parameters that I see as most common. When we look at the documentation we get an idea of the setup but some the options are different for our particular port. I had to experiment a bit to figure out how to make it all work together.
from machine import UART

uart = UART(1, 9600)                         # init with given baudrate
uart.init(9600, bits=8, parity=None, stop=1) # init with given parameters
I found that we initialize the UART object using a combination of the parameters here. Here is how I set mine up.
uart0 = UART(0, 9600, 8, None, 1)
Notice we didn't use the .init() function, that's because it doesn't exist in our port.
The Pico has 2 UART's available, 0 and 1. The pins that are used for these two are configurable but I am using the defaults here. By default UART0 TX is GP0, and UART0 RX is GP1.
- The first parameter '0' selects which UART we want to use
- '9600' is the baud rate we are using
- '8' bits per byte sent
- 'None' for no parity error checking
- '1' to use a single stop bit.
I often see this abbreviated as 9600 8N1. If we were setting up a second device we would match these settings on both devices.
The Loop Back
To test our device we can setup a loop back. We will literally just have the Pico
talk to it's self. We connect the transmit pin (GP0) to the receive pin (GP1) this
way we are just sending messages to ourself. It's the best way to ensure everything
is working because we eliminate almost all other failure points. If you use Linux
at all you may have heard of the loop back or lo Ethernet interface. I have
never stopped to think about the meaning of that name until now when I physically
attached a loop of wire from pin 0 back to pin 1.
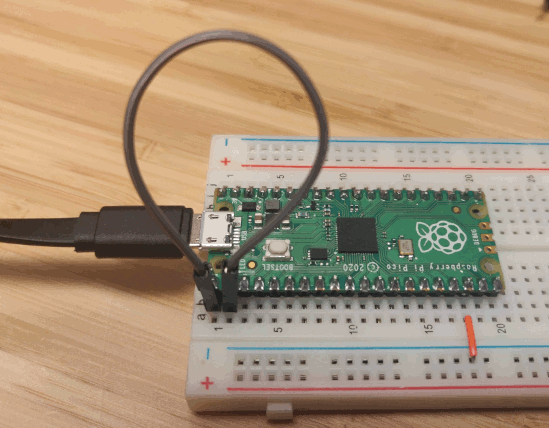
We are ready to run a basic test.
>>> uart0.write('Hello World!')
12
First we have to send a message which is Hello World!, the write function returns the number of bytes written. On a side note, I have always thought of a byte being 8 bit's, it appears this is not true and there is no standard size of byte. So we can refer to our 10 bit packet as a byte.
>>> uart0.any()
1
We use the UART.any() function to see if a message has come in on the RX, which it has so we sent our message out the TX lines the UART then see's a message come in on the RX line. It has no idea it just sent it's self a message. The UART automagically saw the start bit coming from the TX line, started listening to the message and stored it in a memory buffer. We didn't have to tell it to do anything, or we didn't have to tell it anything else except when we setup the uart0 object. Now let's check our message.
>>> uart0.read(12)
b'Hello World!'
We use the UART.read() function to get the data that the UART stored for us. We need to specify the number of bytes we want to grab because at least at this time the timeout feature has not been implemented on the Pico port.(See more here) Without a number of bytes, read() will wait indefinitely for more bytes. We happen to know that we want 12 bytes because that's what our write command told us and because "Hello World!" is 12 characters and each character is one byte. The function returns our message in a byte string.
Handling Reads with Arbitrary Number of Bytes
If you don't know how many bytes you have waiting then one way I came up with is the following.
>>> data = b''
>>> while uart0.any():
...     data += uart0.read(1)
...
>>> data
b'Hello World!'
Initialize an empty byte string called data
As long as uart0.any() is not 0 then get one byte from it
and append it to data.
Using Other Pins
Like I mentioned the two UART's on the Pico can actually be used on diffrent physical pins.
- UART0 TX,RX pin pairs respectivly: 0,1; 12,13; 16,17
- UART1 TX,RX pin pairs respectivly: 4,5; 8,9;
We can specify the alternative pin pairs when we create the UART object two diffrent ways.
from machine import UART, Pin

uart0 = UART(0, 9600, 8, None, 1, tx=Pin(12), rx=Pin(13))

######## Or ########

from machine import UART, Pin

tx1 = Pin(8)
rx1 = Pin(9)
uart1 = UART(1, 9600, 8, None, 1, tx=tx1, rx=rx1)
Wrap Up
I finally have a better grasp on UART hardware and how that relates to TTL serial, RS232 and other comunication protocols that can leverage a UART. It also helps me to better understand when to use serial vs I2C or SPI. The serial TTL really seems best when comunicating with a display, something that will be displaying text. It's designed to send and receive ASCII messages. I am ordering a LCD character display now!